Admit it! You use your iPhone more for taking photos than calling or texting. Wherever people go, they feel like clicking each and every thing which is of significance, be it a nature’s photos, or a funny picture and many people have been seen taking the photos of the food they order at the restaurant. This sounds quite funny that the food first goes to their device memory before going to their tummy. Nonetheless, everyone has their own enthusiasm and this fact can’t be denied that photos are the best part in our iPhone. And this article comprises how to backup iPhone photos to iCloud. Let’s know more about it.
Part 1: Can iCloud Backup iPhone Photos?
Yes, iCloud is a well known way for the iOS device users to backup their data including Photos to iCloud cloud storage service. But remember, iCloud is not able to backup your data completely. It can only backup some of the data types but not all. This is why, for your convenience, we have brought to you a complete list of file types or data which you can backup to your iCloud account.
- Photos & videos stored in your Camera Roll
- iOS device settings
- App Data
- All your Messages, including SMS (text messages), MMS and iMessages
- Call history of your iDevice
- Ringtones
- Home screen folders and icon layout
- Apple Watch Backups
- Visual Voicemail password
- Music, Apps, Movies, TV shows and Books

Note: iCloud only backup Apple deemed data which means as long as you've purchased your music, apps, movies books and tv shows from Apple Store, they’re eligible to be backed up on your iCloud storage. If in case your device have downloads including the apps or music which are downloaded from other sources than Apple Store then they won’t get backed up on your iCloud Storage. You may have to use some other data backup software to backup the data which is not purchased from the Apple Store.
Part 2: How to Backup Photos from iPhone to iCloud
Backing up pictures from your iPhone to iCloud doesn’t require much of technical knowledge but you should be well aware about performing the steps to do it. Here in this section we are going to demonstrate the process of backing up your iPhone’s Photo Library to iCloud.
Step by step tutorial to backup Photos to iCloud
Step 1 – Launch the “Settings” app of your iPhone, tap on “[your name]” and hit on “iCloud”.
Step 2 – Make sure you have enough of the storage space available on your iCloud account with the help of an interactive graphical representation of your iCloud storage space at the top of the iCloud settings.
Note: If you are running out of storage space on your iCloud account, you may have to buy more storage space to backup your iPhone’s Photo Library.
Step 3 – Get into “Settings” app of your iPhone again. Tap on “[your name]”, hit on “iCloud” and then push on “Photos”. Now, turn on the “iCloud Photo Library” if not already.
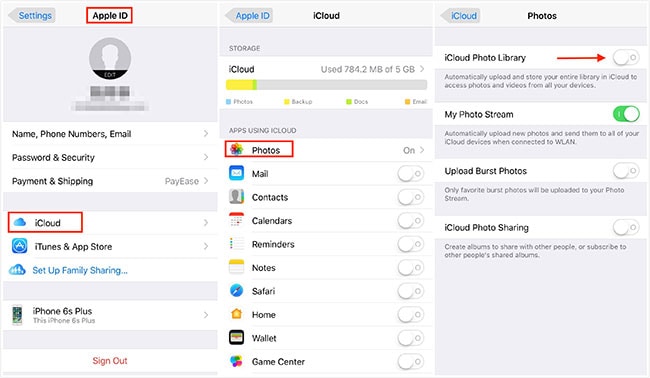
Step 4 – After turning it on, go back to the iCloud settings and hit on iCloud Backup.
Step 5 – Lastly, turn on the iCloud Backup switch, if not already and then push on “Back Up Now” button. It will then start backing up all your Photos to your iCloud account.
[Update] After backing up photos to iCloud, you may also want to know How to Preview and Download Photos from iCloud Backup.

We hope you are now familiar with the process of backing up iPhone photos to iCloud. Although it is a good way and most iPhone users are more partial to this method, iCloud allows only a limited storage. It stores merely up to 5GB which is quite unfair for the users who keeps plenty of data in their device and wishes to save it. Wherefore, we suggest you to make a backup of photos to your computer instead of backing up iPhone pictures to iCloud. If you are wondering how, following is the answer for this.
Things Need to Know about Backup iPhone Photos to iCloud
Now that you are well aware about the data types which can be backed up over your iCloud account and the method on how to backup photos from iPhone to iCloud, let’s now understand a few important things to keep in mind prior to performing a backup of iPhone data to iCloud.
#1. You should have an active and stable internet connection on your iOS device to allow a smooth and error free backup.
#2. Since, iCloud allows you to store data only up to a limit of 5 GB, you should have enough storage space available on your account prior to performing backup to avoid any sorts of errors which may pop up due to insufficient storage.
If in case, you are running out of storage space on your iCloud account, make sure to purchase more space by buying a monthly storage subscription plan that suits your needs.
#3. Lastly, from the list of data types listed in the former part of the article, it is evident that iCloud can backup a major part of your data. That being said, iCloud supports backup for only “Apple deemed data”. In other words, if you have data - like apps, movies, music, books or TV shows - downloaded from any other sources apart from Apple Store, it won’t be backed up to your iCloud account.
How to Backup Photos to iCloud from Mac
Are you looking to backup photos to iCloud from your Mac? Your Mac can be connected to the iCloud account easily. Backing up your Mac in a few simple steps as mentioned below:
Step 1: Let's go to the desktop first on your Mac. You will see an icon below titled System Preferences. Click on it to open up the different system options.
Step 2: Now, you will need to go to the iCloud icon and click on it.
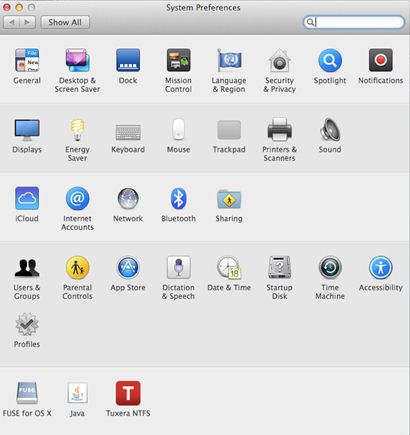
Step 3: The backup screen will appear. If you haven’t already signed in to your iCloud account, do so now.
Step 4: Select the data that you want to backup. You need to select all the items that you need. By default, all the items are automatically checked in for backup. However, keep in mind that iCloud only offers 5 GB as storage space.
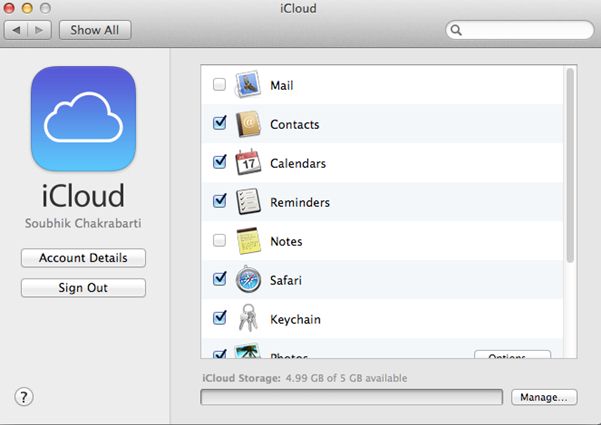
Step 5: Click on ‘Manage’ tab if you want to buy more storage. There, you can select the ‘Buy More Storage’ option to buy more storage.
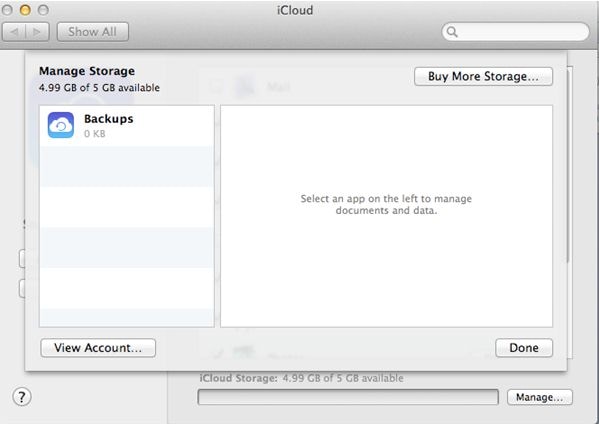
Step 6: Just close the System Preferences tab now. iCloud will automatically start backing up all that you selected to your iCloud account. Just relax and do something else with your Mac!
Tips: How to Backup Photos from iPhone to Computer
Since iCloud has some limitations, if you have made your mind switching to a different method or finding an alternative to backup iPhone photos to iCloud, we would really like to recommend you iSkysoft Toolbox – iOS Data Backup & Restore. We can undoubtedly state this is the best way since it provides a very simple user interface and helps people making backup of the data selectively without any complication.
- It takes a single click to backup the iOS data.
- With this software people can preview and selectively backup your data.
- The supported file types include messages, photos, call log, contacts, WhatsApp data and many more.
- Unlike iCloud backup, you can absolutely backup items that even did't have from Apple Store.
- When you want to restore them, you can also preview the files before restoring to your iPhone or iPad.
- It supports photo formats including JPEG, JPG, PNG, GIF, HEIF, BMP and others.
How to use iSkysoft Toolbox to backup Pictures from iPhone
Step 1. Launch iSkysoft Toolbox on your PC
After downloading the software, launch it in your PC. Take a USB cable and connect your iPhone to the computer. Now, enter the first screen of the program and click on “Data Backup & Restore” tab.

Step 2: Select your Data
In the next screen, you will get all your data on the screen organized in a categorized way. Just select “Photos” option in order to backup those.
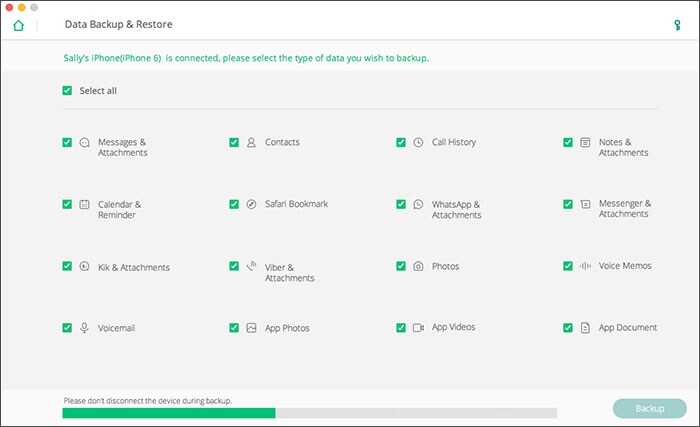
Step 3: Backup Photos from iPhone
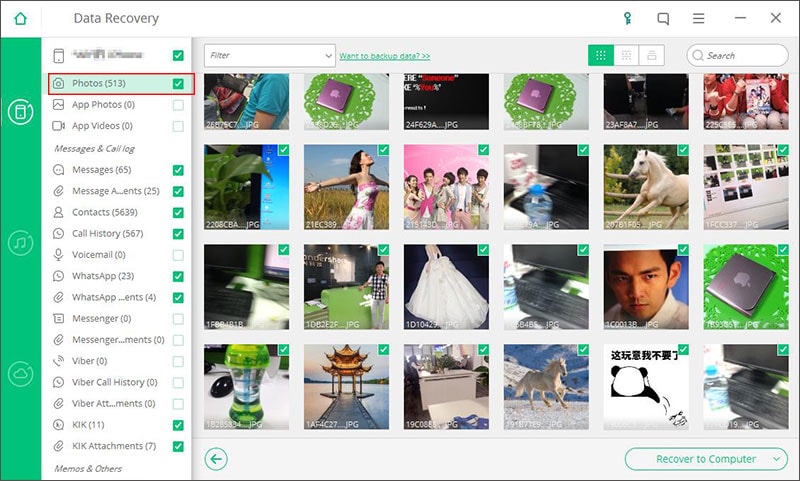
Now, to finish the process, just click on “Backup” tab located at the bottom right side. Wait for the completion of the process for a few seconds. Preview and click "Recover to Computer" button to backup them on your computer. You have done this folks!
See the Video Tutorial on How to Backup iPhone Photos Using iSkysoft Toolbox
(Please watch the it on YouTube with HD quality if this is not clear enough: Backup iPhone Photos to Computer)



![[Solved!] Backup iPhone to iCloud or without iCloud](https://images.iskysoft.us/static-toolbox/images/thumbnail/article-thumbnails823.jpg)


Any Product-related questions? Tweet us @iSkysoft to Get Support Directly