iSkysoft Toolbox - iOS Screen Recorder User Guide
- Part 1. How to Mirror & Record iPhone/iPad/iPod Screen on PC
- Part 2. Troubleshooting: Can’t Get AirPlay Option
- Part 3. Troubleshooting: Can't Find Mirroring Button
Part 1. How to Mirror & Record iPhone/iPad/iPod Screen on PC
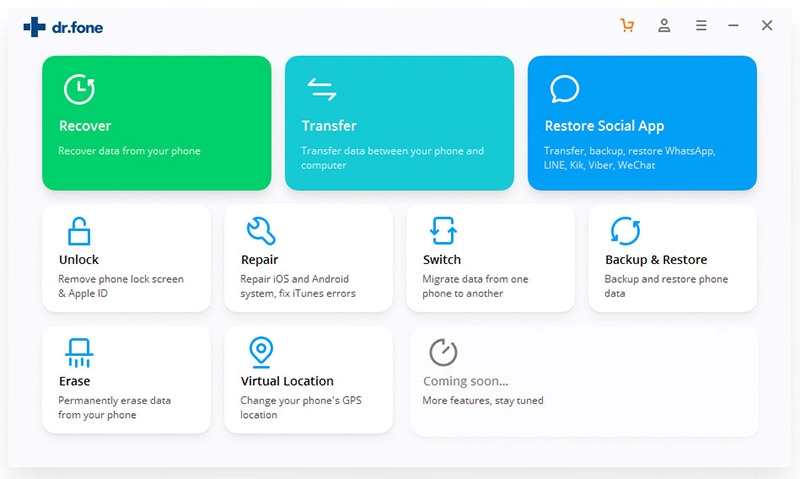
To begin with, download and install iSkysoft Toolbox for iOS on your computer. Run it and you can get an interface as below. Then please choose “Screen Recorder” feature to continue.
Now you will get the “iOS Screen Recorder” interface, just act as the following steps to mirror and record iPhone/iPad/iPod screen to your computer.
Step 1. Connect iOS Device and Computer to the Same Local Area Network (LAN)
Before mirroring iOS screen to PC, you have to connect them to the same Wi-Fi or local area network. There is no need to connect iPhone/iPad/iPod to your computer via USB cable here.
Step 2. Mirror iPhone/iPad/iPod Screen to PC
For iOS 10, iOS 11:
Unlock your iPhone, then swipe up from the bottom of your screen to access Control Center. Now you will see an "AirPlay Mirroring" option, just click it and select "iSky(PC Name)" to mirror your device to the computer.
For iOS 9, iOS 8 and iOS 7:
After swiping up from the bottom of your screen and going to the Control Center, please hit the “AirPlay” option > choose "iSky(PC Name)" > enable “Mirroring”.
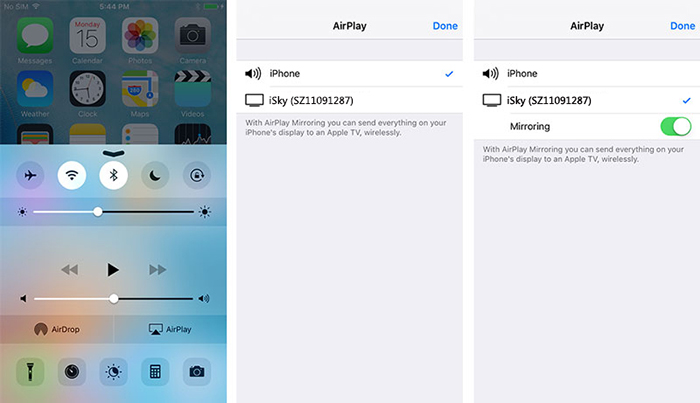
Now you should have mirrored your iOS device to the PC successfully. Failed to get the AirPlay option? Check here to get solutions.
Step 3. Record iOS Screen
While mirroring your iPhone/iPad/iPod screen to the computer, you can see a red round button that can be used to record screen. To finish recording, just click the red round button again.

By the way, hit the right square button to display a full screen if you want. And you can hit the square button again or press “Esc” button on your keyboard to exit the full screen mode.
Finally, the recorded video will be saved in HD MP4 format. Open the recorded video file and you are able to freely play and share it whenever you want.
Part 2. Troubleshooting: Can’t Get AirPlay Option
Some iOS 9/ iOS 8/ iOS 7 users complain that they can’t find the Airplay option in Control Center. If you encounter with the same trouble, please check here to get detailed solutions.
Solution 1: Check whether your iOS device and computer have connected to the same network
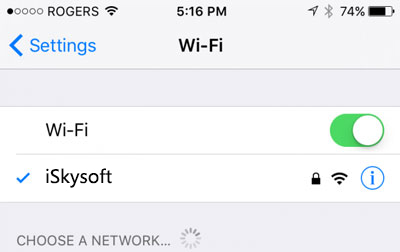
For iOS 9/ iOS 8/ iOS 7 users, the AirPlay option only shows up when your iPhone/iPad/iPad device have connected to the same Wi-Fi or local area network with your PC. Here you can unlock iOS device, then go to Settings > Wi-Fi, choose the network your computer is connecting to.
If this solution doesn’t work, please try the Solution 2 below.
Solution 2. Check whether iOS Screen Recorder program is blocked by the firewall
After launching iOS Screen Recorder, you may get a pop-up window of Windows Security Alert. Here please click on "Allow access" to allow the iOS Screen Recorder program to communicate on your private networks and public networks.
However, if you have clicked the “Cancel” button or your PC doesn’t get a pop-up window, please follow the steps below to allow access manually.
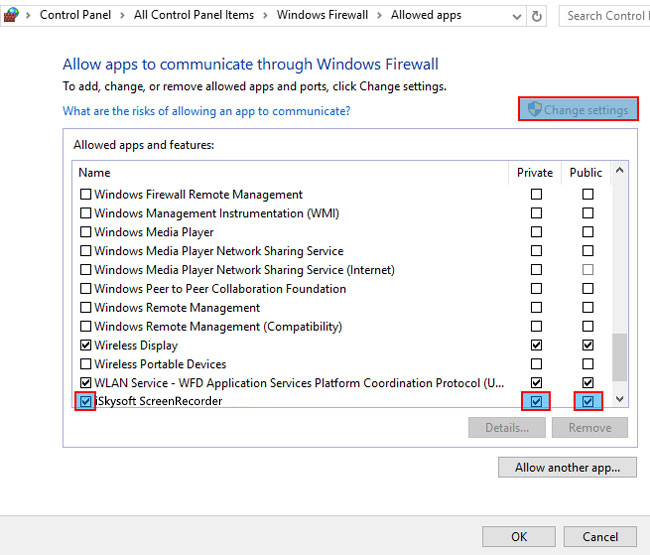
Go to "Start" > "Control Panel" > "All Control Panel Items" > "Windows Firewall" > "Allowed apps". Then you can find iOS Screen Recorder is listed on “Allowed apps and features”. Click on "Change settings" button and tick "iSkysoft ScreenRecorder" to allow the iOS Screen Recorder to communicate on private and public networks.
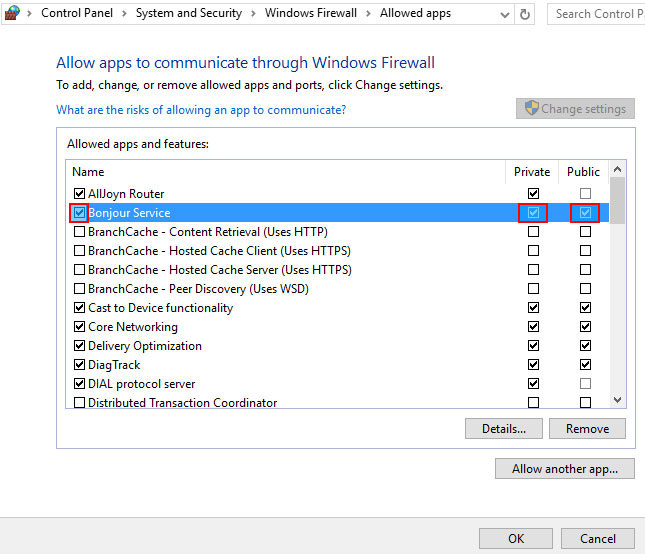
And also, make sure "Bonjour Service" is allowed to communicate through the Windows Firewall.
Additionally, please check if your antivirus software block the start of AirPlay, iOS Screen Recorder and Bonjour Service.
And you need to turned off the firewall. Directly go to "Start" > "Control Panel" > "System and Security" > "Windows Firewall" > "Customize Settings" and turn off Windows Firewall under the "Private network settings" and "Public network settings".
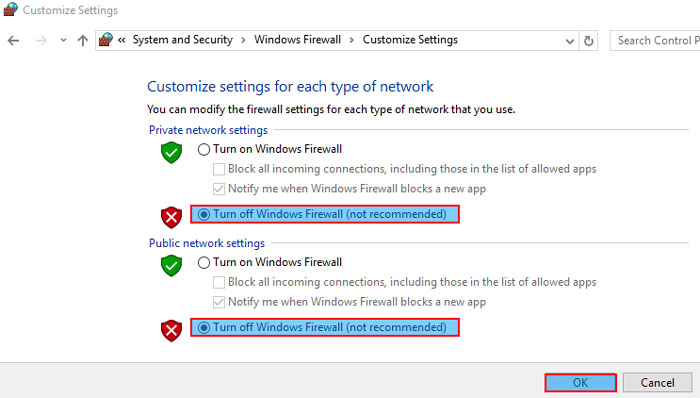
Finally, please restart the iOS Screen Recorder to see if you can see the AirPlay option.
Solution 3. Enable Bonjour Service on PC
When you download and install iTunes, Bonjour Service, which is a LAN (Local Area Network) service developed by Apple Inc., will be installed on your computer. If there is no Bonjour Service on your PC or this service is damaged, then AirPlay feature on your iOS devices will be unable to work well. Now you can follow the steps to enable Bonjour Service on your computer.
Here please go to "Start" > "Run", input "services.msc" and click "OK".
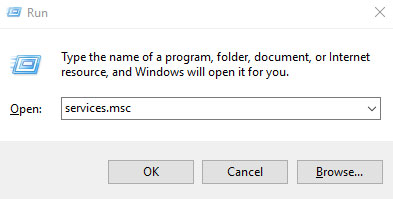
After getting a pop-up window, locate "Bonjour Service". Right click it and then hit the “Start” option. If the Bonjour Service is running, please click “Restart”.
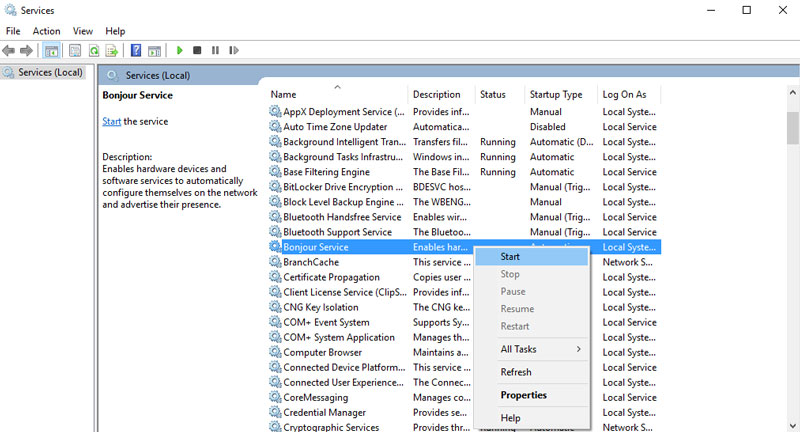
However, if the Bonjour Service is disabled, you need to enable it manually:
1. Right click "Bonjour Service" > "Properties";
2. Go to the "Startup type" option > choose “Automatic”;
3. Tap on "Apply" and select "Start" under "Service status";
4. Click “OK” to complete the process.
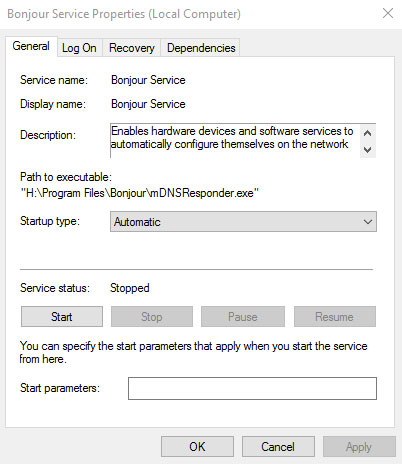
After the above steps, you can open iOS Screen Recorder program again and check whether you can get the AirPlay option from the Control Center.
By the way, if there’s no Bonjour Service under “Services”, then you have to manually download one on your PC.
Solution 4. Reboot your iOS Device
If all the above solutions still don't work for you, now please reboot your iPhone/iPad/iPod and you will find the AirPlay option in Control Center.
Part 3. Troubleshooting: Can't Find Mirroring Button
Can’t see the “Mirroring” button after taping the AirPlay option? Don’t worry, you can check here to get solution.
Step 1. Unlock your iPhone/iPad/iPod, swipe up from the bottom to open Control Center. Hit AirPlay option and you will see the window below:

Step 2. Select your PC from the list, then you will find the "Mirroring" button, just enable it. Finally you can easily mirror your iOS screen to computer via iOS Screen Recorder.
